de vita sua
a blog
Getting images out of Office files
by John D. Muccigrosso
Note: This is a companion piece to my last post on getting images out of PDFs.
I spent a lot of time this past academic year getting scanned images out of other people’s Microsoft Office files (Word and PowerPoint). It’s not difficult, but it’s not as easy as you might think.
Office Files
I’m going to talk here about just the latest iteration of Microsoft Office files, the ones with the “x” on the end of the extension, and for the purposes of this post, I’ve made a pretty basic Word file with a single image in it.
You might think that you could simply use Word (or PowerPoint) to extract that image, and indeed if you right-click on the image within Word, you get an option to Save as picture... which brings up a save dialog and exports the image. If you take a look at that exported image, you’ll discover that Word has exported a version that is not at all identical to the original, especially in size. (That you have to choose the file format when you do the export is a hint that Word is going to be altering it along the way.) And even if you could get Word to export an identical image, this would be a fairly tedious way to do it for any file containing more than a few images.
Instead we’ll rely on that fact that recent Office files are actually zipped folders that contain the text, media, and other things that go to make them. This is easy to see: just manually change the extension on one of these files to “zip” and then double-click on it to have your default un-zipping app uncompress it into a folder. (You might have to assign this app, if you don’t usually use zip files.) Here’s a screenshot of a file I made for this demo along with a copy that I renamed and then unzipped.
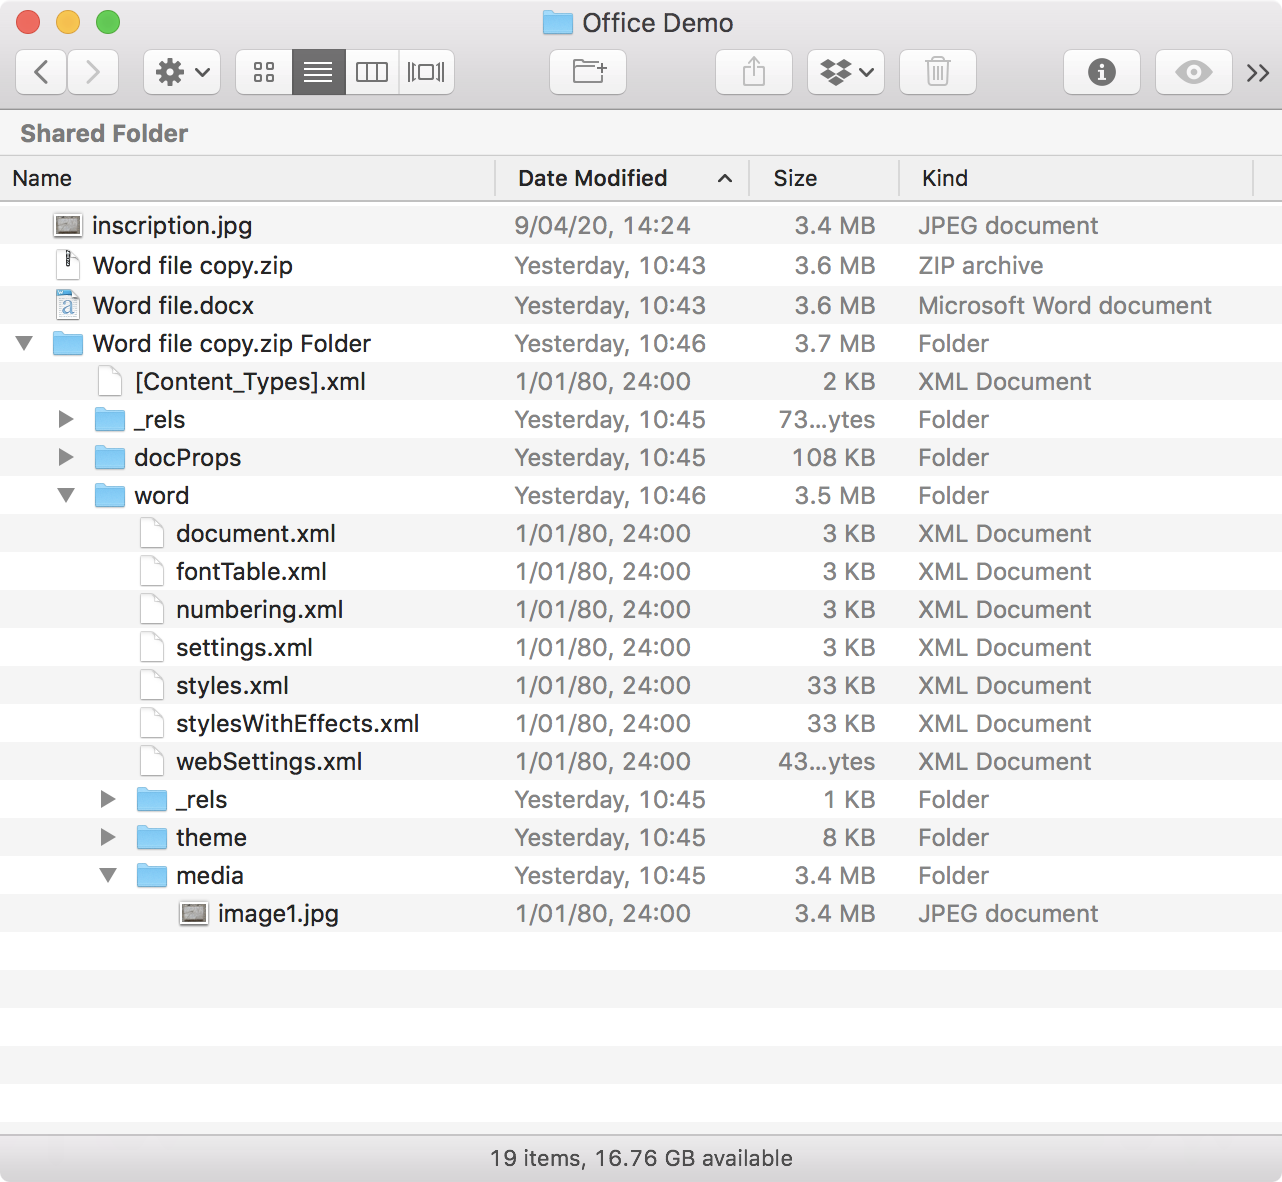
(Image by John D. Muccigrosso CC BY-NC-SA 4.0)
In there you can see four top-level items:
Word file.docx: the original Word file itselfWord file copy.zip: a copy of the original with the new “zip” extensionWord file copy.zip Folder: the unzipped copy (shown expanded)inscription.jpg: the image I inserted into the Word file
First note that the unzipped folder is hardly much bigger than the original. That’s because it’s a very small file without much content and the one image that’s in it is a jpg, and so already about as compressed as it’s going to get. Zip can’t really do better than the jpg compression already has. Were the Word file to have more content, that difference would be larger.
If you look at the contents of the unzipped folder, you’ll that I’ve expanded down to one sub-folder, media, and inside that folder is a single jpg with a fairly generic name, image1.jpg. That’s the image file that I stuck in the document. Note that it’s the same 3.4MB size as the original.
All we need to do then with any Word file (and this works with PowerPoints, too) is to unzip it and copy out the files in that media folder. We lose the original name, but the files themselves are otherwise the same.
To the command line!
Rather than the several steps I outlined above, we’re going to us the command-line version of the unzip utility (which conveniently comes built-in with the MacOS) to do all the heavy lifting. This should work that same way on Windows or UNIX systems, mutatis mutandis, of course
The command looks something like this:
unzip -n -j -d <output directory> <output filename> word/media/*
Let’s look at that a bit:
- -n tells the utility to never overwrite existing files when doing the extraction. We’ll try to use a unique output directory to avoid this problem, but just in case.
- -j junk the folder structure of the original. We don’t want all those internal word and media folders, just the images.
- -d use the directory (i.e., folder) we’re about the name to deposit the extracted files into.
- The last bit says which files within the zipped file (which for us is the Word file) should be unzipped. Note that the use of the wildcard
*means we’re not being terribly particular, but just getting everything we can out of the media folder. This can result in some files you don’t need being extracted, but it make sure we don’t miss anything.
Here’s an example of the command structure with “real” file system names:
unzip -n -j -d '/Users/username/Documents/Aug-10_extracted_images' '/Users/username/Documents/Word file.docx' word/media/*
This will extract all the media files in the “Word file.docx” in the Documents folder and deposit them in a folder called “Aug-10_extracted_images”, also in Documents. And that’s it!
AppleScripts
Because I use a Mac, it’s as usual fairly easy to turn this into an AppleScript. This one is posted as “Get Office images” in my AppleScript github repository under “image extraction”. Since unzip is built in, you shouldn’t need to install anything else. Put the droplet app version somewhere handy and just drag and drop your Word or PowerPoint files onto it. The script creates a new folder in the same place as the original file, appending a time stamp onto the name, which should make it unique (I’m being only a tiny bit lazy there), and extracts the media files into it.
Google suite
Like Microsoft Google has a suite of apps that make it remarkably inconvenient to extract the image files. Assuming you find yourself in this situation (perhaps a shared file or one into which you directly uploaded the images), the workaround is straightforward:
- Download the file as a PDF or Office file
- Extract the images from the downloaded file
This works for both Google Docs and Slides.
Tags - AppleScript - cli - Google - Office - technology - zip